How did it all start? Well it started when I acquired a somewhat dilapidated 1/24 scale Bburago Jaguar XK120 Coupe. It had become a victim of a burglary whereby the said model had hit the deck and suffered the loss of all its wheels and acquired several grazes/scratches to its rather mundane shade of white paint. The owner of it ended up donating it to me, remembering that I happened to be a Jag Freak, and we joked that I should do something with it – like build an old shed around it or something!.......Hmmm. That was nearly three years ago. Blighter got me thinking though, all the same.
The shed part of it was never in any doubt. But then I started imagining a scene where a Bloke might remember that his Grandad used to have an old Jag. Then he might recall that it got parked up around behind the old barn, down on the farm, however many years ago. Finally after many years he manages to extract the Jag and embarks on a journey of restoration – a classic tale of the journey from Rags to Riches!!
So began a period of research and decision making. Should the walls of the barn be wooden or iron? And what colour should they be? Should the floor be dirt or concrete? Should the “showroom” part of it have carpet or tiles on the floor? Should there be one or two steps up to the stage? What colour should the “new” car be? (It too started out off-white coloured!).
The first problem solved itself easily. Being a fussy fart, I wanted to keep everything to scale as much as possible, and the roll of corrugated cardboard I discovered that my wife had bought from Spotlight, was almost exactly the correct scale for 1/24 scale, in fact it was only half of one corrugation different!! – Decision made!! Of course the traditional colour for a barn on a farm is red – Decision made!! Even at this stage I had enough inspiration to make a start on the basic construction. The base and walls were made of good old 18mm MDF, simply glued and nailed together. Next came a little contouring of the left side done very quickly with an electric planer and a file (whoever heard of a piece of dead flat ground on a farm?). Then I could proceed with the “corrugated iron” – kindly donated by my loving wife! This was simply glued to the wall surfaces with PVA glue, left to dry and then finally trimmed.

The traditional red paint had to be done at this point, because once the shed was built in position, it would restrict access to the inside walls with a paintbrush. Of course, being such an old barn, the paint has faded and oxidized badly, so to replicate this I experimented a little and settled on a recipe of Tamiya acrylic paints with a some Matt Red darkened a bit with a touch of Matt Black to dull it down a bit – The fun part of “rusting” it all up would come later.
The focus now was on the lean-to type shed. This followed roughly, standard building methods with typical 4x4 posts, a 6x2 beam, 4x2 rafters and 3x2 purlins to support the roof, which was made of the same corrugated iron - cardboard. The wooden framing timber was handily cut down to scale, to my usual fussy, pedantic standards, from appropriately gauged Balsa Wood, then assembled on my workbench, painted up in your typical “aged wood” paint and attached to the base – again with PVA. This was done after I had painted in the concrete floor. For this I used a Model Railroading product called Floquil. These took some getting used to as when using them, as they seem to be very “runny” and appear to have no depth to them until I started experimenting with layering of coats, just adding a bit at a time until the desired effect is accomplished. And they have a very “flat” finish to them too – not a good look - to have shiny concrete, I think!!

While all this was going on, and I had time to fill in while watching paint dry!, I could also start messing around with other aspects of the project like the cars themselves. Obviously the wreck I had inherited was going to be the “rusty” one, so in a short time I had it totally dismantled. The first job was to attack the metal work. This entailed grinding down the edges of the guards and doors from the inside out, with a Dremel tool until they were wafer thin. I couldn’t go too far or I would have nothing left. I spent quite a while doing this, but as you can see, it was pretty successful.
At each stage along the journey I found myself planning the next sequences to follow, two or three steps ahead. For example, because there were no wheels, how was I going to mount it? Or, if the engine was to remain in the car, how would the bonnet have to be set? Or what else would I have to set on the base before I had to mount the car in its final resting place? Anyway, Dremel work also included enlarging cavities in the bonnet where the grille had been and also in the guards where the headlamps previously had been.
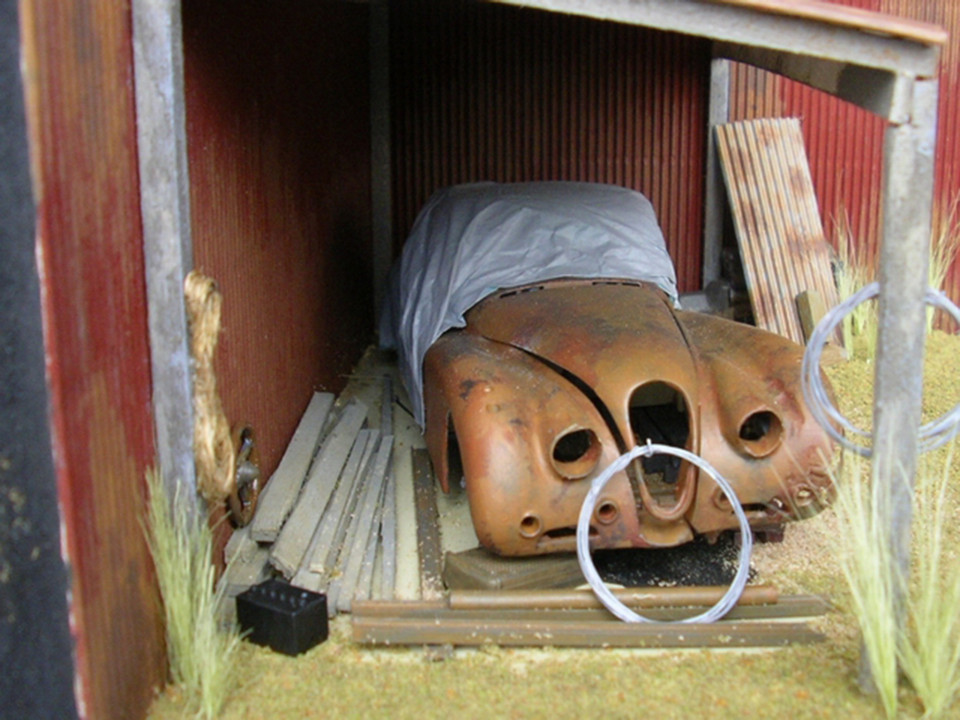
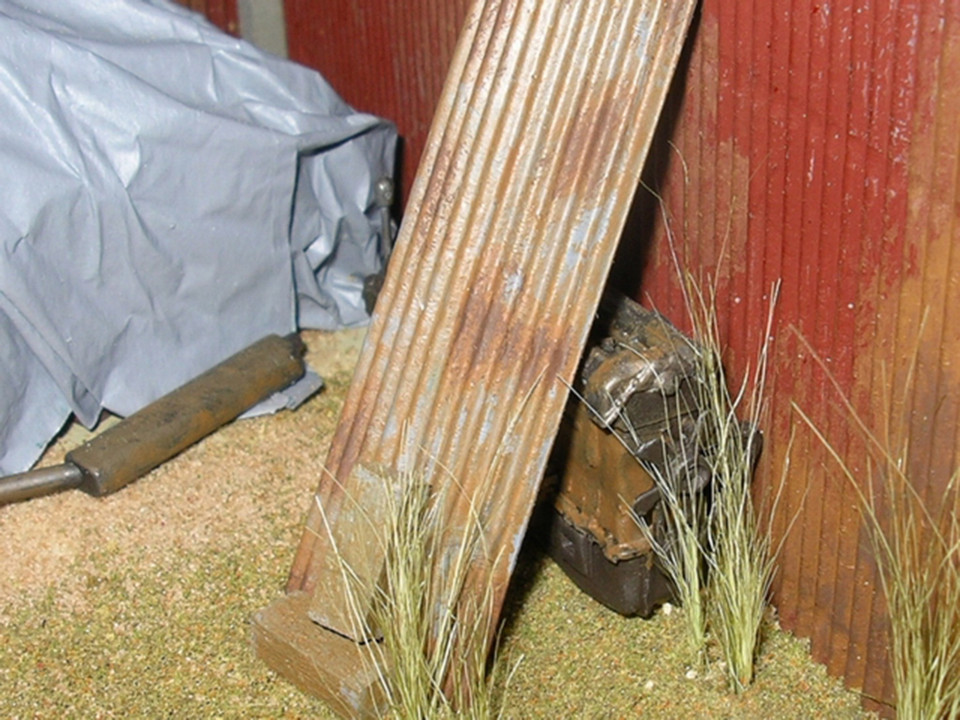
As can be seen in the photos, the decision was made to leave the engine and gearbox out of the car, and so were painted up in “grunge and greasy sludge” then parked in the corner and protected from the harsh weather by a piece of old iron. Speaking of the gearbox, - it and the muffler, because they were only seen from beneath the car, were in fact hollow. That is, had no top half to them, so I dutifully set about finishing off the manufacturing process by forming the shapes of both with good old body-filler. Yep – “bog”, the type your panel-beater would use on your real car! I then used my standard shade of grease and rusty-grunge paint on the engine and gearbox, and just ordinary plain old flaky rust paint on the exhaust!
If you took notice you’ll see how I solved the problem of the missing wheels. Old bricks were created out of some carefully cut Balsa wood, painted an appropriate shade of red/brown, glued into blocks of four and then glued in turn, to the lower edges of the wheel hubs. This gave me a basic final mounting height by which I could measure the width of the tarpaulin which would be draped over the car. More on this later. I could also start playing around with possible final positioning points while also thinking about some of the other accessories. These are the stack of old timber you see behind the car, also the couple of rusty old lengths of RSJ Steel and the piece of old steam pipe. The stack of timber is some random lengths of Balsa wood painted up in my favourite shade of “aged wood” and glued into place untidily. The RSJ is a couple of pieces of Modeling Polystyrene, again a Model Railway product found at your local Hobby Shop. The piece of Steam pipe is simply a length of Heatshrink tubing - an electrical product.
One of the things I was always conscious of, was that I didn’t overdo things and have so much junk lying around, that it would detract or distract ones eye from the center pieces – the two cars. So, perhaps I have created the “minimalist” farmyard look. How many times have you seen a farm with piles of machinery, junk and who knows what lying around?
Back to the car. It was time to start painting procedures. This began with sanding – like you do – with 400 grit sandpaper and then a couple of coats of primer. And more sanding. The painting itself, was really a big experiment with colours, techniques and textures. The other big thing I always had to keep reminding myself of, was that rust has no rules! Who said that rust had to take a certain shape or form? Or what is the exact shade of browns to use? No - rust is its own boss, so I just kept going until it looked right! Yep – that’s all I could do. Layering, dabbing with a paintbrush, washing a wee bit with some thinners, more dabbing with a different shade, and so on, until I was happy. Or more likely, that I made myself stop in case I ruined it, would probably more accurate! In fact, this is what I did for the RSJ’s, steam pipe, and the engine & gearbox unit as well. Was it successful? What do you think?
If you have been reading Miniature Auto for the last several years you will have discovered plenty of ideas, hints, tips and advice. Among these would have been a “recipe” for making a tarpaulin. Yes – our resident modeling guru – Maurice Boyles is to blame for this one! If you recall, it is very simple – Wrap object in Gladwrap or similar. Prepare a solution of PVA glue and water. Soak appropriate sized tissue paper for a few moments. Apply tissue paper (yes – tissue paper – you did read right!) to model, and set to shape desired. Leave to set for a few days. Remove tarpaulin – now hardened, and the Gladwrap. Paint as desired. Yes – it really is as simple as that. The idea behind the tarpaulin came as I thought about the time when the owner of the car might have decided to make a start on restoration and with a great rush of enthusiasm, flung back the tarpaulin, removed the engine and gearbox, and promptly left it as it was, covering the engine and gearbox with a sheet of iron. I guess it’s happened before!
While all this was going on however, a problem was brewing. I still had to find a second car for the other side of the diorama. I did have one, but that was firmly ensconced in my display cabinet. As it happened, I did spy one in Toyworld just before Christmas. Exactly what I wanted – Bburago, XK120 coupe, 1:24 scale, and only $29.95. Crafty old me thought that because it was just an old Jag and not the popular roadster model, that no one would want it! Huh – famous last words – needless to say, it had disappeared by the time I decided to rescue it, and now I couldn’t find one anywhere – nowhere! Toyworld tried other branches – nothing, even the N.Z Distributors couldn’t get them anymore. Then I saw one on Trademe and immediately had a crack at it thinking I might get it for $20.00 – but would you believe - it went for $65.00! I couldn’t believe it. Now what? Only one thing for it – my display cabinet was about to make a donation! Well after all, it too, was that putrid shade of off-white that I mentioned earlier, which didn’t suit the car anyway so I resigned myself to prepare it for painting.
Anyway, back at the Barn - now that I had the tarpaulin finished, and the car painted and mounted on its bricks, I could finally consider setting it on the base. This I did by using the original mounting point that held the car to its box, and a long screw from another model, then drilling a hole right through the base at the right point. This had been marked when I had the car all in bits and could mark through the chassis directly onto the base. Just before I set the car finally, I took the opportunity to lay the ‘turf’. This is probably familiar to many as being a model railway product too, but does the job perfectly. This was another job for the trusty PVA glue and water solution, this time in a trigger spray bottle which was squirted in a mist onto the base - after I had masked off the lean to shed and the main walls. Then some turf was sprinkled on and let to set, shake of the excess and then repeat the exercise two or even three times until it looked like enough was on to show a little contour.
The last major job on this half was to rust up the corrugated iron on the walls and the roof. This was done with another of the Floquil paints. This one called, for some strange reason – Rust! – Funny that! As I said earlier, there are no rules for rust, so I just went at it, a bit at a time and layer onto layer (about 4-5 layers until it was right), then finished each patch off with a smudge of dark brown flat paint in the middle. Job done!
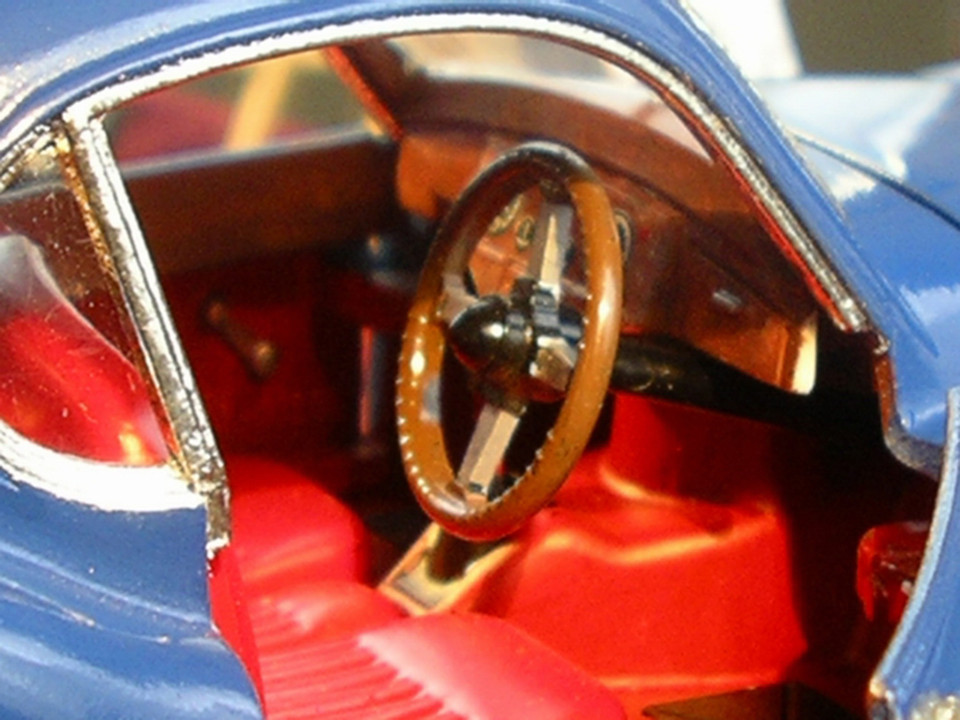
Now, I could focus on the next stage. As mentioned, I now had another car to prepare. This I did by stripping the whole thing done to the bare basics and then converted it to RHD – It is a British car after all. Now I could start painting – pretty much everything. Those who are familiar with the Bburago models will know that the interiors are pretty stark and not finished to any sort of standard at all, so I literally started painting it all from the inside out, aiming for the traditional looking leather & walnut interior that Jaguars are famous for. The seats and interior trim were painted in a semi gloss enamel to represent the red leather you would also typically find in a Jaguar. The floor was painted in a darker shade of matt red to become the carpet. The door handles and window winders were touched in with some silver paint. The wood trim on the steering wheel and dash board was done also with an enamel, but this time a full gloss was used and then I used a dip of black and some thinners to create some wood grain effect.
During this stage, I also had time to spare while watching paint dry, so was able to tackle some other stuff – multi-tasking I think it’s called – but don’t tell my wife! Jobs to do were obviously the painting of the exterior of the car and also the base and platform which had to be done. The platform or stage on which the car was going to sit was pretty straight forward. Again good old MDF, this time 6mm - was used. I originally thought about creating a tiled floor such as might be found in a museum or showroom or such but then settled on the carpet effect. Besides, it was cheap! Yep – good old Spotlight to the rescue. Seems they were having a sale – like they do, and this dark red velvety, velour type material was perfect, so – I did the decent thing and bought a whole half a metre of the stuff, - a bit of an investment I suppose – well what would you have done – at a staggering $1.50 per metre? – Yep a whole .75c bought me a huge amount - in diorama terms. What followed was a simple straight forward application of spray adhesive and careful wrapping of the material around the edges of the stage and also on the floor and up the end wall of the room. Next up was the piece of mirror on the back wall. This only had to be cut carefully to size and then glued onto the surface.
Now the end was in sight. The final major job was the painting and detailing of the body. This commenced like you normally would with sanding – lots of it. Because of the multiple and complex curves each sanding session took quite awhile. I started with 400 grit sandpaper and then sprayed on a couple of coats of primer. Then sanded some more. Now some colour. The blue was chosen mainly because I wanted to create a decent contrast in tones i.e. I didn’t want a red car on red carpet or anything boring like that. I am also a fan of Oxford Blue – a proper Jaguar colour. This isn’t an exact match as any person with normal colour vision would tell you, but is what was available from a can. Yes – a spray can! Tamiya spray can #TS15 was found at my local Hobby Shop. I do actually own an Airbrush, but to date have never had a chance to learn how to drive it or experiment with it. Maybe I’ll have it sorted in time for my next diorama! – Yeah right!!
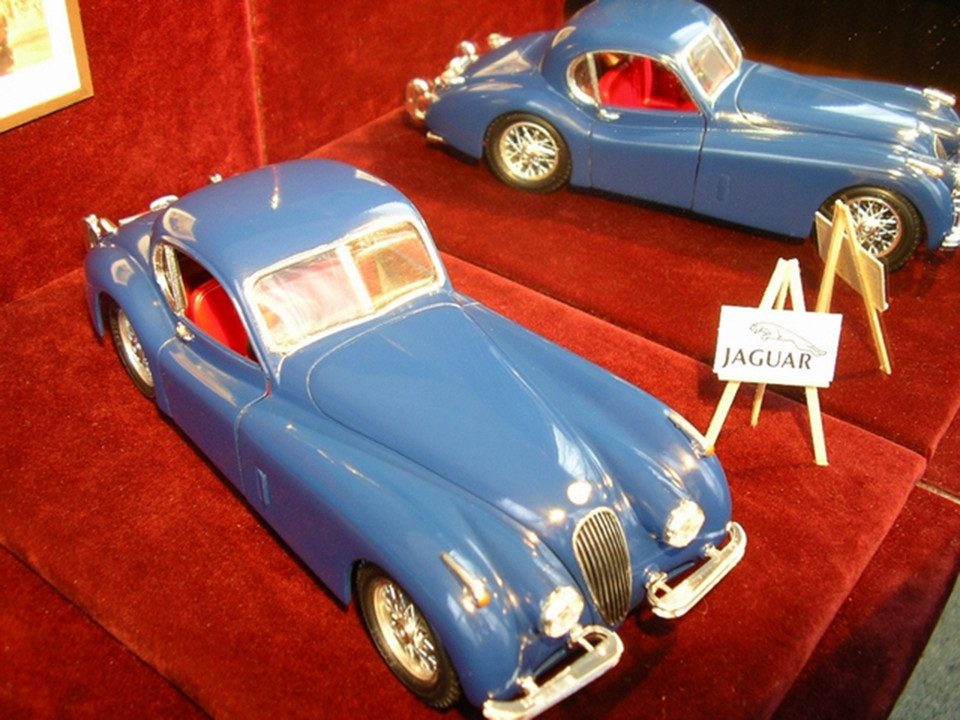
Now the routine was repeated – several times, sanding – now with 600 grit sandpaper - then a couple of coats of colour until I had a satisfactory depth of colour. In all, there are probably 6 full coats of paint in total on the car. The last job in this stage was the final cut and polish. This was done after about 4-5 days of curing time so the paint had a chance to harden up fully. The cut & polish was done with a well know car product called Paint Doctor from Repo. This was carefully rubbed in and then buffed up to bring up a startlingly good finish. I was really pleased how good it shined up.
From then on it was pretty much just assembly, detailing and accessories. Detailing of the car consisted of adding colours to tail lights and indicators, giving the grille a wash of black, and adding a few spots of silver. The other main addition was some chrome foil. This is a self adhesive film of chrome foil, where you just apply foil to part, rub gently to aid adhesion, and then trim gently with a sharp knife. Parts plated were around the windscreen & centre bar, exterior door handles and around the window openings. This was fairly straight forward to do and is way better than painting with silver paint. Thanks once again to our resident modeling guru - Maurice Boyles for his generous donation of the foil from some of the multitude of modelling supplies he has accumulated.
Then the unthinkable happened. Another car came up on Trademe this time in British Racing Green – my next most favourite colour. Now what? I dutifully put a bid on it and this time, I owned it – for only $25.00. Sigh!! This car now lives in my display cabinet. Sigh!!
Now the car could be finally mounted, done in the same way as the rusty one, with a screw up from the bottom to the original mounting hole. The last two items to do were the easel with the name on it and the framed picture mounted on the wall behind the car. The easel was done very easily with just four pieces of thin modelling wood, similar to Balsa – actually another Model Railway product called Scale Lumber, which was cut and glued together. The poster was simply a logo photocopied from a page of one of my Jaguar magazines and then trimmed down to size. The framed print is also actually a photocopy from out of a brochure. It had to be reduced to about 20% of its original size and then glued to a piece of fine card. The frame was then made up of Balsa wood and the whole thing glued to the wall. Back at the Barn – I took the opportunity to add a couple more bits - I tucked the radiator under the front of the car and, I found a battery that I quickly painted up and sat on the ground, and also the steering wheel, which found itself, perched on top of the timber stack. This effectively signalled the end of the project.
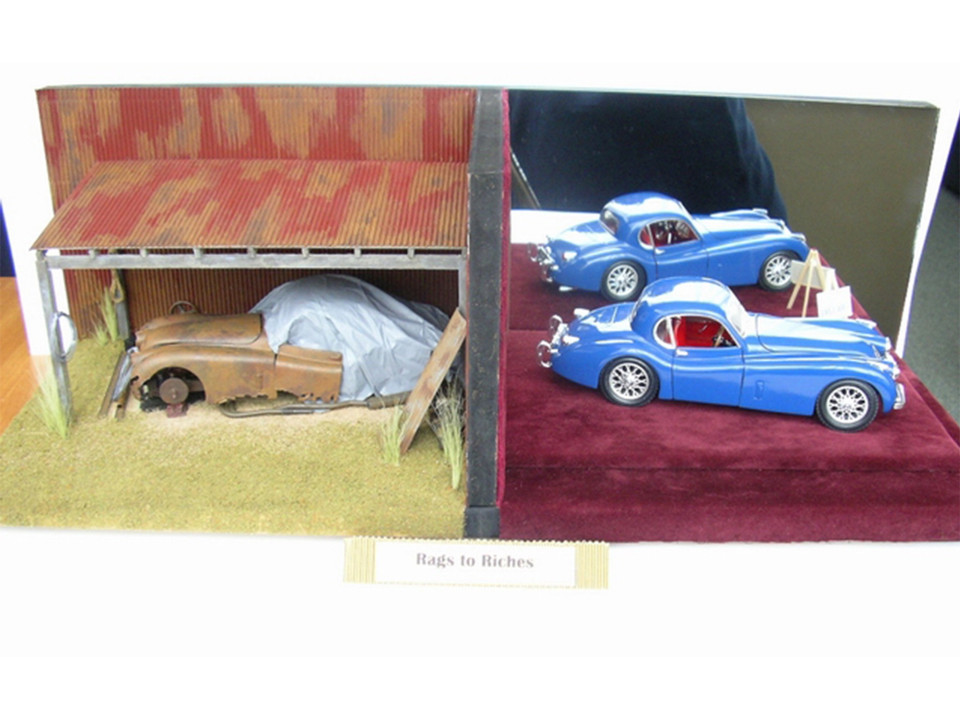
As can been seen by the photos, the overall result has turned out very satisfactory. Time taken – approximately 40-50 hours, but who’s counting? If I had to make some changes, it would be to track down some wire wheels to rust up and leave lying around the place. If asked if there was some particular favourite part of it, I would say the tarpaulin, the stack of timber and the sheet of iron covering the engine and gearbox.
If I were asked to give a scale of difficulty from 1 to 10 it would only be a 5 or 6. The reason being is that this would be well with in the capabilities of anyone who possessed some basic modelling skills. After all – this was my first diorama of this type too! There were no special tools or skills required, most materials were very readily available and the most important skills required are a willingness to experiment a little, a bit of patience and some imagination. Are you going to have a go at one? – I dare you!
Shayne Spicer
2008